Choosing APU2
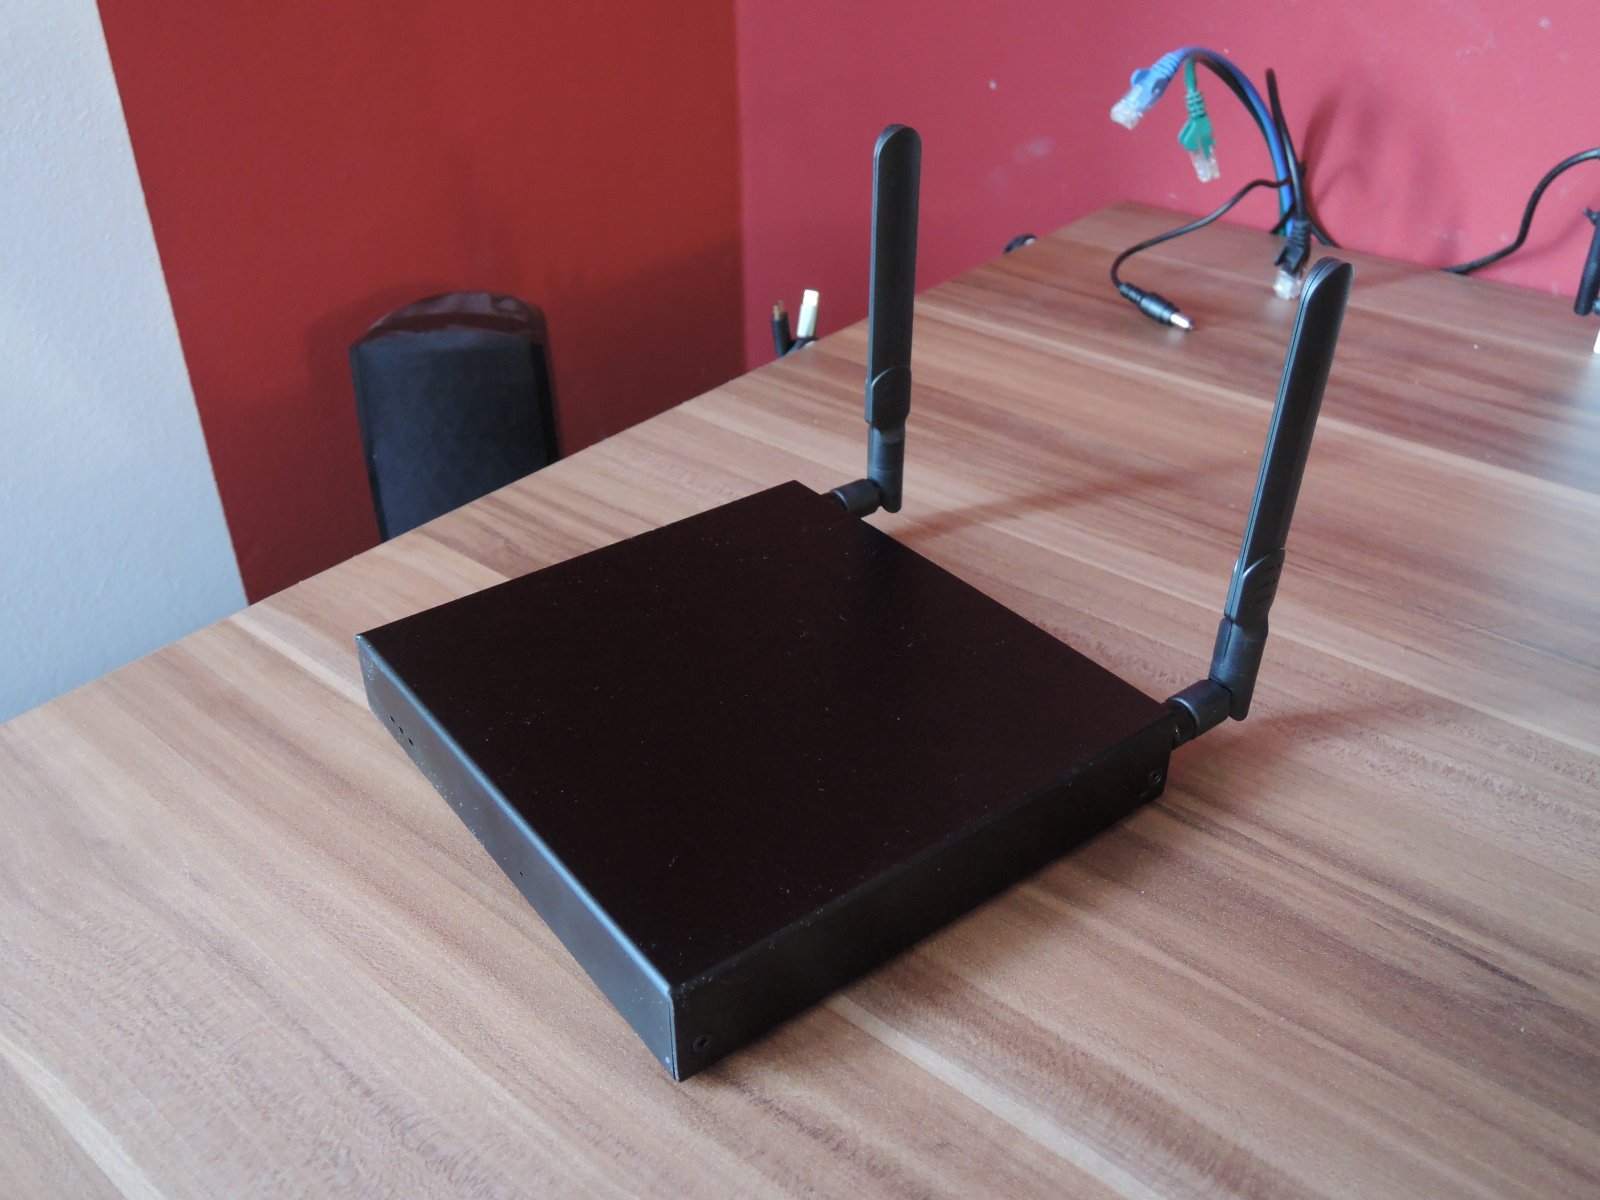
I have replaced my home router (Asus RT-N16 running TomatoUSB by Shibby) and NAS (Synology DS212+) with a single device – APU2C4 from PC Engines running CentOS 7. The better specs/faster hardware is obvious advantage among other things like:
- No fan or noisy 3.5 HDD
- No delay in disk access because of HDD spin-up
- APU2 takes less space than single Asus router
- Lower power usage: APU2 is usually at 5-9 Wh (while router was 9 Wh plus NAS 12+ Wh)
- x86 CPU
Because of the CPU and pretty standard PC hardware, it’s possible to install anything like pfSense, OpenWRT/LEDE, CentOS, Debian, Arch Linux, Gentoo or even VMware ESXi among other systems. Even that TomatoUSB or DSM (from Synology) have large user userbase, full featured operating systems offer more standard sets of tools without really weird or obsolete quirks (like different iptables parameters based on CPU architecture).


APU2 isn’t perfect:
- The compatible metal case offers only 2 antenna cutouts while 5 would be the today’s standard
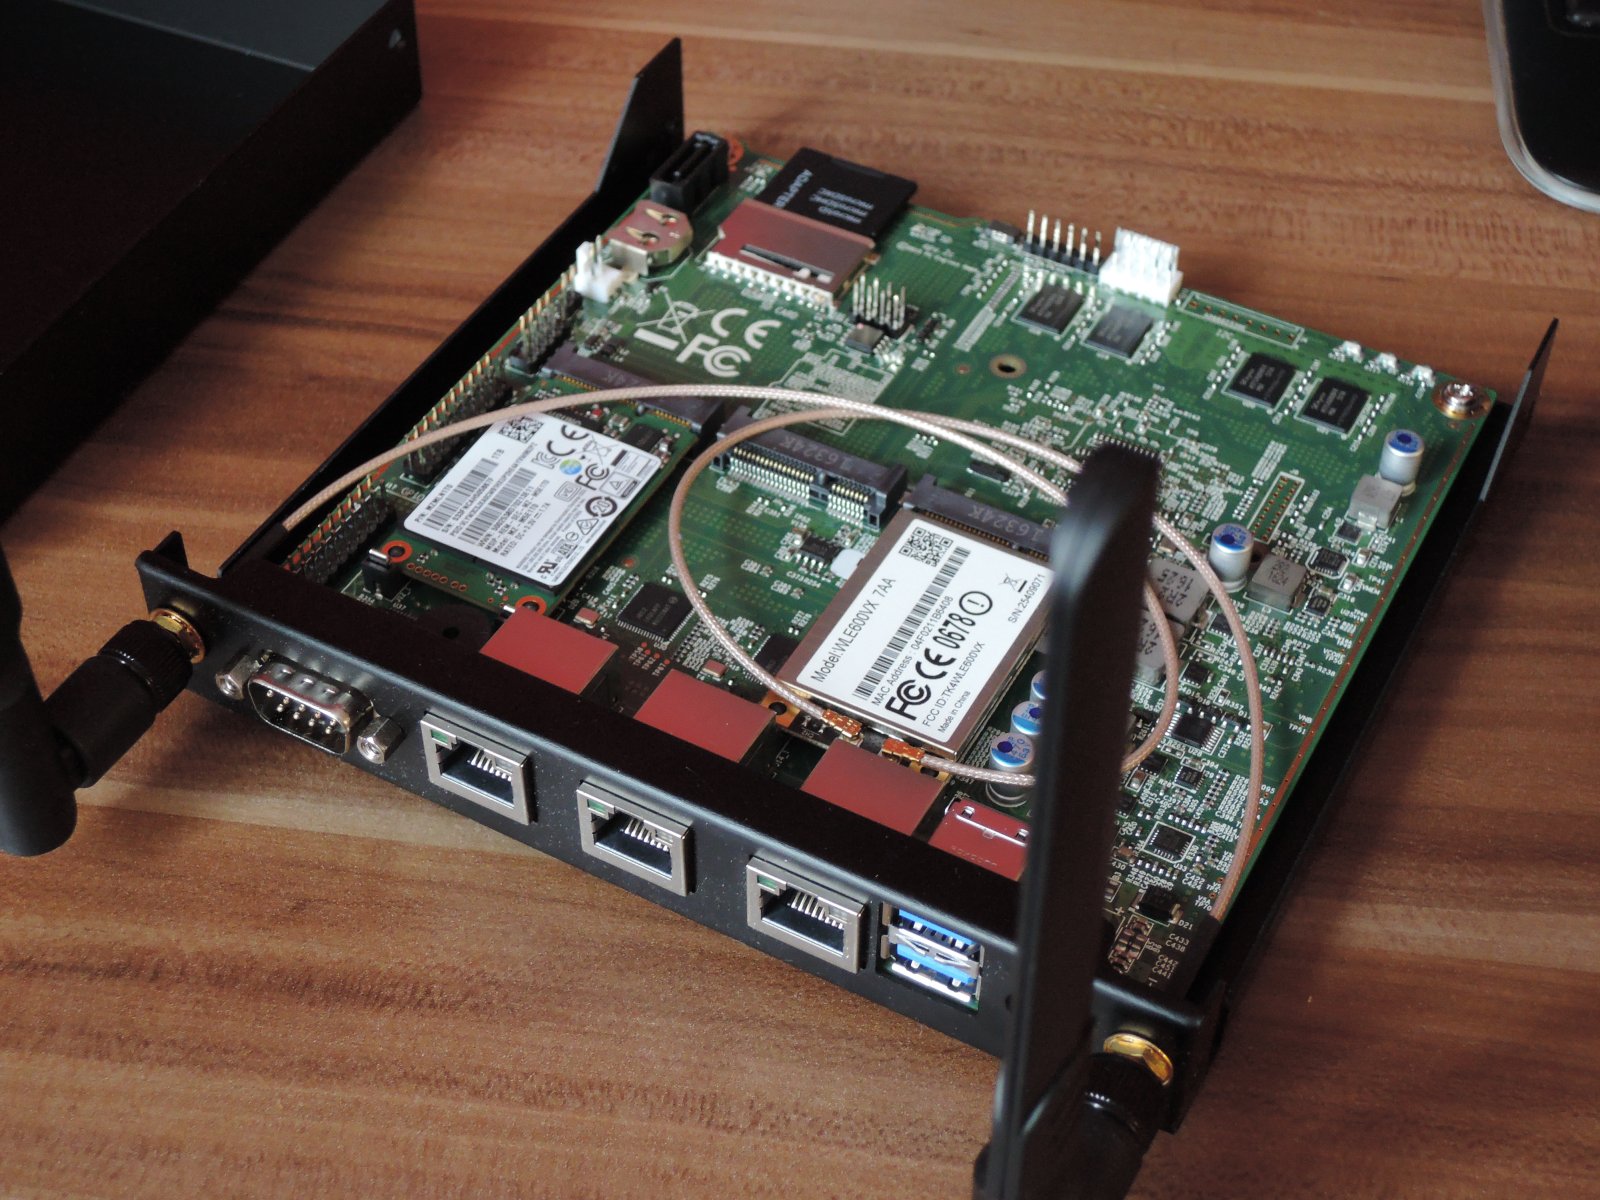
- USB ports right next to ethernet making it impossible to directly plug some larger flash drives (like Corsair Voyager GTX)
- DB9 serial port – it just works (null modem cable & serial to usb with no extra drivers, just Putty) but come on…
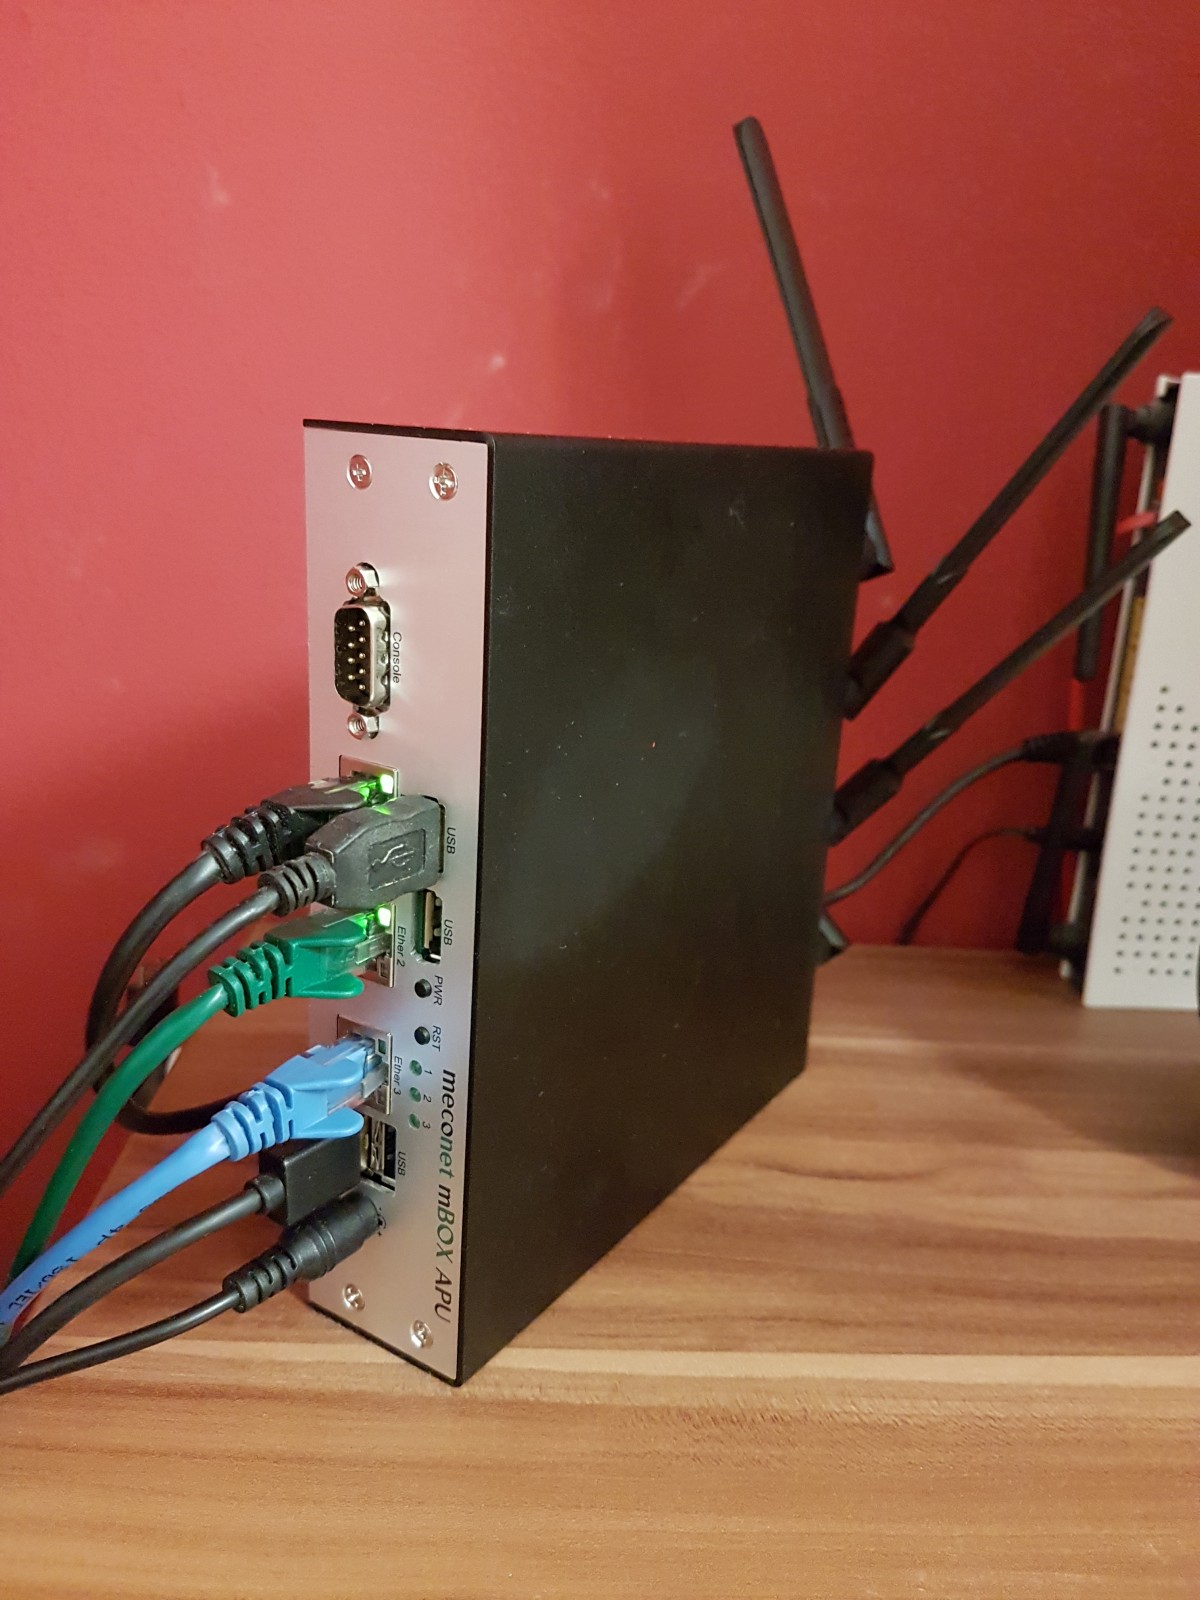
Update: I have switched to another chassis – mBOX Desktop from meconet. It’s pricey but there’s just nothing else like that. It offers following:
- 7 antenna cutouts (RSMA). (2 for 2.4 GHz and 2 for 5 GHz WiFi while I still can upgrade to 3-antenna wle900vx once I test driver on CentOS 7)
- 2 extra USB 2.0 ports (for APU2C4). APU3A4 has one more USB header (but one less PCI capable mini PCIe slot)
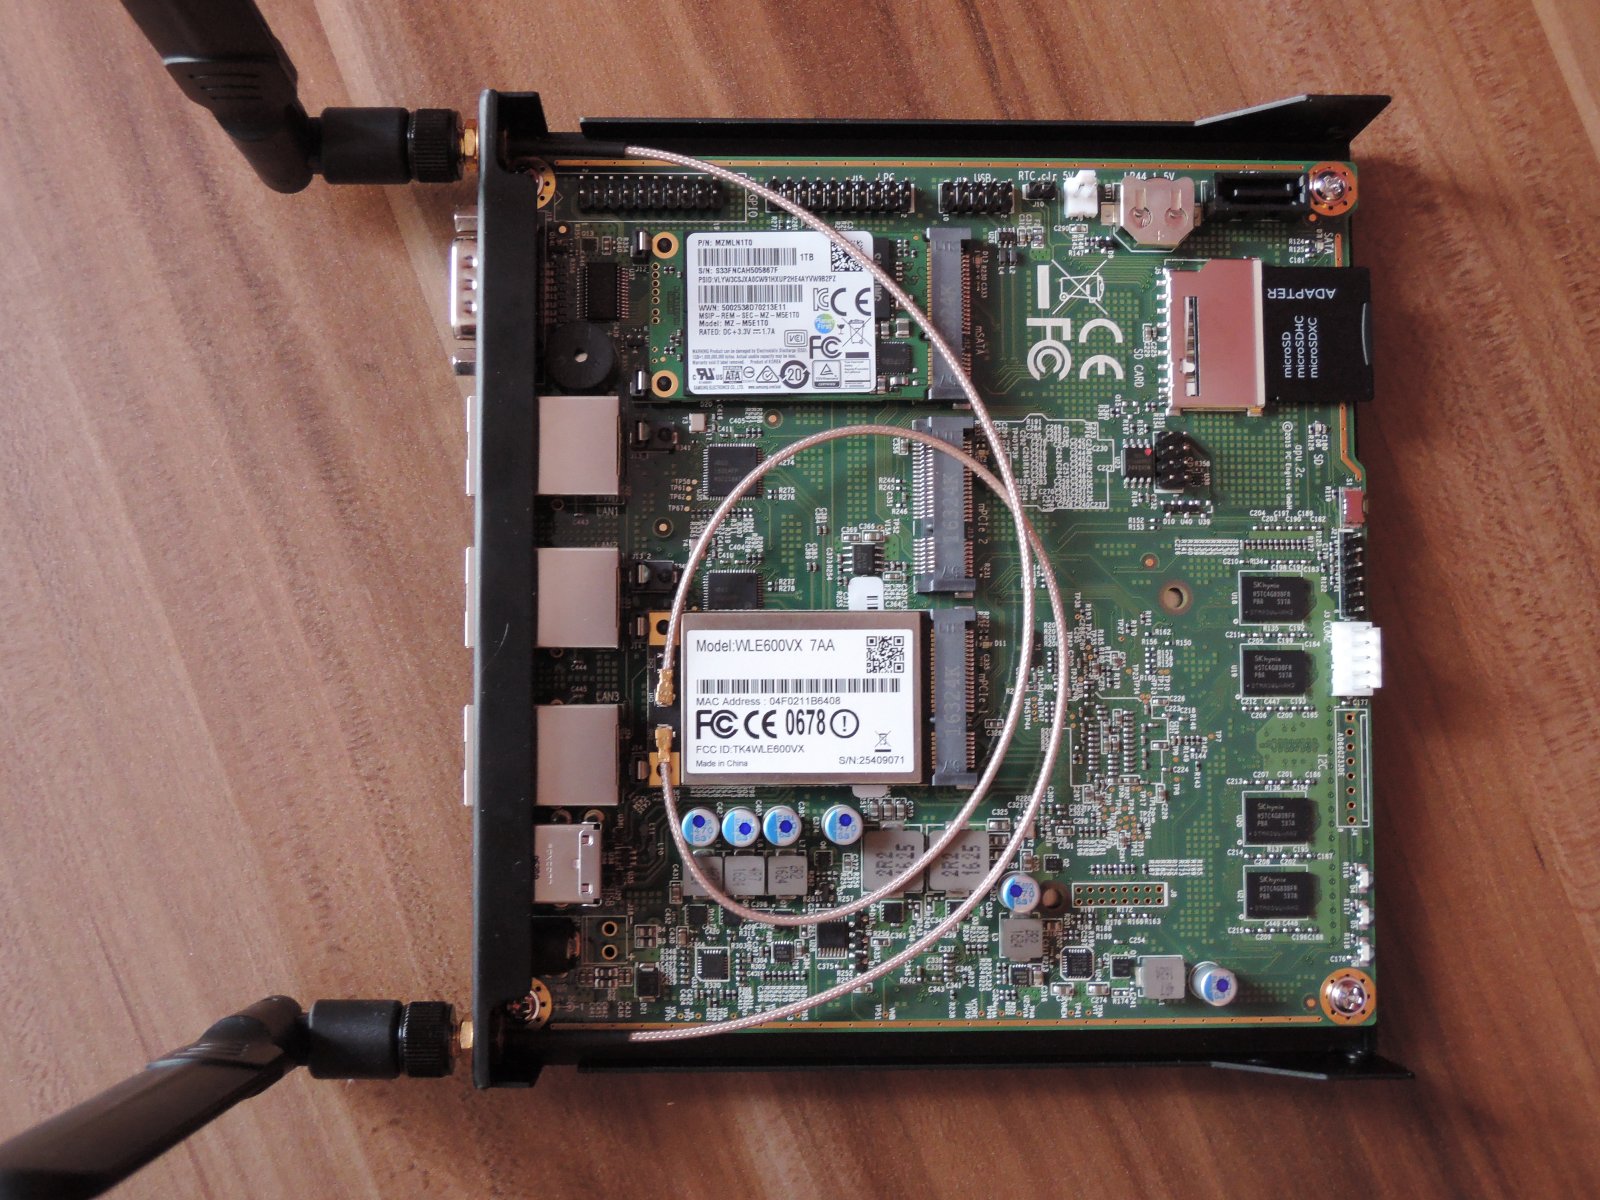
- Internal bracket for 2.5″ HDD. This means up to 4 TB SSD (since there are mSata drives no bigger than 1 TB).
- Cover that allows easier access to internal SD card.

I place my APU2 on a side as the CPU runs 10 °C cooler that way.
Alternative 1: Old laptop
I tested my configurations on old laptop (Lenovo Thinkpad X201) and it actually was repurposable as a router.
- The ThinkPad USB 3.0 Ethernet adapter worked around the lack of multiple NIC’s.
- Extra Express Card with 2 additional USB 3.0 ports indeed worked and offered faster than USB 2.0 speeds.
- Power usage of that i3 CPU moves between 12 and 25 Wh which seems acceptable for the speed.
- Having keyboard and display for quick access is great.
- Standard Intel wireless (PCIe) card didn’t allowed creating AP but it worked when it was replaced with Atheros card (WLE200NX from Compex)
- The X201 has two wireless cards slots (WLAN + WAN) and two pairs of antennas allowing for pretty decent wireless configuration. I actually tied using the pair of WAN antennas with WLE200NX on both 2.4 and 5 GHz and it worked with only negligible difference from the WLAN antennas.
but…
- Lenovo does not allow swapping wireless cards and so BIOS contains whitelist of compatible cards. You need to flash patched BIOS.
- One wireless card works with that patched BIOS but two cards don’t. I’m not sure if it’s a “bad” patch or hardware limitation (maybe flashing coreboot would help).
- It uses fan and is too large to place on a desk for all year round use.
Alternative 2: Netgate RCC-VE 2440
It has some advantages over APU2:
- One more ethernet port
- Full configuration of 5 antenna cutouts
- “Slightly” faster CPU
- Mini USB for console access
but…
- It’s $549 right now while it was $349 just few weeks before
- Only USB 2.0 ports
- It still may not work with 2 installed Wifi cards. Bummer!
Alternative 3: Celeron J1900 mini pc from Qotom
There is couple of different models and variations of mini pc powered by the Celeron J1900 CPU. Search AliExpress for J1900 router to get the idea. Based on various feedback, they are actually pretty good devices. Video out (even when VGA only) simplifies lots of installs. Unfortunatelly:
- Only one slot for wireless card. That half mini PCIe slot is also described as “USB signal” according the manufacturer meaning that majority of regular cards will not work. The use of “USB over PCIe” limits compatible card to up to 480 Mbit/s. So forget about 802.11ac or pfSense.
Alternative 4: Turris Omnia
Turris Omnia is powered by ARM CPU and runs modified OpenWRT version with lots of handy features.
- Other operating systems are supported only within virtual container.
- No DIY fun in building everything from the ground up.
The CentOS Kickstart bits
Here are some APU2 or router specific parts for inspiration to use in your Kickstart. To start the actual installation from the Kickstart file, I recommend putting it as a “ks.cfg” file on FAT32 formatted USB flash drive with label “OEMDRV”.
Addressing the mSata drive
For some reason with the coreboot on APU2, sda is not the mSata drive but the just booted USB drive. Anyway, since there’s only one usable mSata port for drive, it’s best to address it by path.
# Run the Setup Agent on first boot
firstboot --enable
ignoredisk --only-use=/dev/disk/by-path/pci-0000:00:11.0-ata-1.0
# System bootloader configuration
bootloader --append=" crashkernel=auto" --location=mbr --boot-drive=/dev/disk/by-path/pci-0000:00:11.0-ata-1.0
# Partition clearing information
clearpart --all --initlabel --drives=/dev/disk/by-path/pci-0000:00:11.0-ata-1.0
# Disk partitioning information
part / --fstype="xfs" --ondisk=/dev/disk/by-path/pci-0000:00:11.0-ata-1.0 --grow --label=centos
Network configuration
Red Hat recommends using Network Manager and firewalld with RHEL 7. There is really no need to use iptables directly. In my usage probably the worst thing is slow bash completion of firewalld commands on the APU2.
I start by defining own firewalld zones (because I find the names of the zones too specific and always forgetting the right names). The internal zone lan has no restrictions at all while zone wan is for the public/internet connection.
firewall-offline-cmd --new-zone=lan
firewall-offline-cmd --zone=lan --set-target=ACCEPT
firewall-offline-cmd --new-zone=wan
firewall-offline-cmd --zone=wan --set-target=DROP
firewall-offline-cmd --zone=wan --add-masquerade
The actual connection to the internet is via another VDSL modem in transparent bridge mode. Package rp-pppoe needs to be installed.
nmcli connection add type pppoe ifname enp1s0 con-name dsl username o2 password o2 ppp.mtu 1492 ppp.mru 1492 connection.zone wan
Enable IP forwarding.
cat << 'EOF' > /etc/sysctl.d/10-ipv4.conf
net.ipv4.ip_forward=1
net.ipv4.conf.all.route_localnet=1
EOF
Because of the PPPoE connection lower MTU and various improperly configured devices on the internet it’s basically needed to use the MSS to PMTU workaround.
firewall-offline-cmd --direct --add-passthrough ipv4 -I FORWARD -p tcp --tcp-flags SYN,RST SYN -j TCPMSS --clamp-mss-to-pmtu
For an actual communication among home devices a bridge/switch is needed. For home use you want to disable STP since it adds up extra delay on first connection. The beauty in using Network Manager is that it will also automatically handle running dnsmasq (DHCP + DNS). “ipv4.method shared” is troubled so configure network manually.
nmcli con add type bridge ifname br0 bridge.stp no ipv4.method manual ipv4.addresses 192.168.1.1/24 connection.zone lan
nmcli con add type bridge-slave ifname enp2s0 master bridge-br0 connection.zone lan
nmcli con add type bridge-slave ifname enp3s0 master bridge-br0 connection.zone lan
Even though Network Manager is in charge of controlling dnsmasq, you can fine tune majority of parameters – basically anything other than DHCP range (as it’s hard coded in NM based on the selected subnet). /etc/NetworkManager/dnsmasq-shared.d/dnsmasq.conf Make sure dnsmasq is enabled and configure it like that:
cat << 'EOF' > /etc/dnsmasq.d/br0.conf
interface=br0
no-hosts

dhcp-range=192.168.1.100,192.168.1.150,255.255.255.0,12h
dhcp-option=option:router,192.168.1.1

address=/home.example.com/192.168.1.1
address=/example.com/1.2.3.4
dhcp-host=00:11:22:33:44:55,192.168.1.10,DiskStation,infinite
cache-size=1000
Network Manager can switch wireless card to AP mode but it uses wpa_supplicant for that. To fully utilize Wifi (5 GHz and/or 40+ MHz bandwidth), you have to use hostapd. For that, the card interface must not be managed by NM.
cat << 'EOF' > /etc/NetworkManager/conf.d/NetworkManager.conf
[main]
plugins+=keyfile

[keyfile]
unmanaged-devices=interface-name:wlp4s0
EOF
For Wifi in AP mode, you need to have hostapd, haveged (for entrophy) and crda (regulatory thing for 5 GHz and wide bandwidths). I currently use single Wifi card (Compex WLE600VX) for 5 GHz only network. I could configure it for 2.4 GHz but for dual band WiFi, you would need two cards. (Do not get APU3 if you want to connect two mPCIe cards as on APU3 the mPCIe 2 slot is USB channel only.) With following configuration, the card runs at full 866.7 Mbps (2X2 MIMO).

sed -i -e 's|^\(interface=\).*|\1wlp4s0|g' /etc/hostapd/hostapd.conf
sed -i -e 's|^\(hw_mode=\).*|\1a|g' /etc/hostapd/hostapd.conf
sed -i -e 's|^\(channel=\).*|\136|g' /etc/hostapd/hostapd.conf
sed -i -e 's|^\(ssid=\).*|\1home|g' /etc/hostapd/hostapd.conf

cat << 'EOF' >> /etc/hostapd/hostapd.conf
wpa=2
wpa_key_mgmt=WPA-PSK
rsn_pairwise=CCMP
wpa_passphrase=my-password

bridge=br0
ieee80211n=1
ieee80211d=1
ieee80211h=1
ieee80211ac=1
ht_capab=[HT40+]
country_code=DE

# for 80 MHz
vht_oper_chwidth=1
vht_oper_centr_freq_seg0_idx=42
vht_capab=[MAX-MPDU-11454][SHORT-GI-80][MAX-A-MPDU-LEN-EXP0]
wmm_enabled=1
EOF
firewalld even supports ipset so it’s possible to limit access to your ip address. I have put file src/de.cidr containing only allowed ranges of ip networks to the USB flash drive labeled OEMDRV.
mount /dev/disk/by-label/OEMDRV /mnt/

firewall-offline-cmd --new-zone=wan-de
firewall-offline-cmd --zone=wan-de --add-masquerade

firewall-offline-cmd --new-ipset=de --type=hash:net
firewall-offline-cmd --ipset=de --add-entries-from-file=/mnt/src/de.cidr
firewall-offline-cmd --zone=wan-de --add-source=ipset:de
firewall-offline-cmd --zone=wan-de --add-service ssh
firewall-offline-cmd --zone=wan-de --add-service https

firewall-offline-cmd --set-default-zone=drop

umount /mnt/
Configuring Network Manager from kickstart actually doesn’t save the config files in the newly installed chrooted environment. Work around is to copy the newly generated confings to the right places manually.
%post

# ...

%end

%post --nochroot

cp -p /etc/NetworkManager/system-connections/* /mnt/sysimage/etc/NetworkManager/system-connections/
cp -p /etc/sysconfig/network-scripts/ifcfg-* /mnt/sysimage/etc/sysconfig/network-scripts/
#cp -p /etc/sysconfig/network-scripts/keys-* /mnt/sysimage/etc/sysconfig/network-scripts/

%end
Samba
On one hand Samba saturates the network during read at 115 MB/s but I was unable to get more than 90 MB/s during writes (while smbd utilized one core in full). I tried downgrading max protocol, signing and encryption but without success of getting any higher write speed.
The following config sets up anonymous/guest share so use with caution.
mkdir -p /srv/data
chmod 777 /srv/data/
groupadd share
chmod g+s /srv/data/
chown :share /srv/data/
#mkdir -p /srv/data/Download
#chmod 775 /srv/data/Download

echo "umask 002" >> /root/.bashrc
usermod -aG share apache
#usermod -aG share transmission

#### Samba ####

mv /etc/samba/smb.conf /etc/samba/smb.conf.orig
cat << 'EOF' > /etc/samba/smb.conf
[global]
workgroup = WORKGROUP
server string = Samba Server %v
netbios name = home
security = user
map to guest = bad user
dns proxy = no

vfs objects = recycle
recycle:keeptree = yes
recycle:versions = yes
recycle:repository = /srv/data/.recycle

strict allocate = yes
#======================
[Data]
path = /srv/data
browsable = yes
writable = yes
guest ok = yes
read only = no

force user = root
force group = share
force create mode
force directory mode
create mask = 0664
directory mask = 0775

veto files = /._*/.DS_Store/
delete veto files = yes
EOF

cat << 'EOF' > /etc/cron.daily/samba-recycle
#!/bin/bash
rm -rf /srv/data/.recycle
EOF

chmod +x /etc/cron.daily/samba-recycle
SSL certificate with own CA
Generate your own Root Certificate Authority, put it inside your operating systems and be fine for the next 40 years (that’s for the CA, for certificate I used 10 years). Since I use Nginx to reverse proxy every SSL related service, I put the certificates directly in its directory.
# Generate own CA - run only once and backup keys
openssl genrsa -out /etc/nginx/ssl/ca.key 4096
openssl req -x509 -new -nodes -extensions v3_ca -key /etc/nginx/ssl/ca.key -sha256 -days 14610 -subj "/CN=root" -out /etc/nginx/ssl/ca.crt
openssl genrsa -out /etc/nginx/ssl/domain.key 2048

# Generate certificate signed by your own CA
#openssl req -new -sha256 -key /etc/nginx/ssl/domain.key -subj "/CN=home.example.com" -out /etc/nginx/ssl/domain.csr
#openssl x509 -req -in /etc/nginx/ssl/domain.csr -CA /etc/nginx/ssl/ca.crt -CAkey /etc/nginx/ssl/ca.key -CAcreateserial -out /etc/nginx/ssl/domain.crt -days 3652 -sha256
#cat /etc/nginx/ssl/domain.crt /etc/nginx/ssl/ca.crt > /etc/nginx/ssl/chain.crt

# Generate certificate signed by your own CA, including Subject Alt Names, required since Chrome 57!
cat << 'EOF' > /etc/nginx/ssl/openssl.cnf
[req]
distinguished_name=req_distinguished_name
req_extensions=v3_req

[req_distinguished_name]
commonName=home.example.com

[v3_req]
subjectAltName=@alt_names

[alt_names]
DNS.1=home.example.com
EOF

openssl req -new -sha256 -key /etc/nginx/ssl/domain.key -subj "/CN=home.example.com" -reqexts v3_req -config /etc/nginx/ssl/openssl.cnf -out /etc/nginx/ssl/domain.csr
openssl x509 -req -in /etc/nginx/ssl/domain.csr -CA /etc/nginx/ssl/ca.crt -CAkey /etc/nginx/ssl/ca.key -CAcreateserial -extensions v3_req -extfile /etc/nginx/ssl/openssl.cnf -out /etc/nginx/ssl/domain.crt -days 3652 -sha256
cat /etc/nginx/ssl/domain.crt /etc/nginx/ssl/ca.crt > /etc/nginx/ssl/chain.crt
jDownloader
Running jDownloader inside the chrooted Debian on old Synology NAS with only 512 MB and fairly slow ARM CPU was no fun. Now it’s fun again. It requires package java-1.8.0-openjdk-headless.
mkdir -p /opt/jdownloader/cfg/
wget http://installer.jdownloader.org/JDownloader.jar -O /opt/jdownloader/JDownloader.jar

adduser -Md /opt/jdownloader -G share -s /sbin/nologin jdownloader
cat << 'EOF' > /opt/jdownloader/cfg/org.jdownloader.api.myjdownloader.MyJDownloaderSettings.json
{
"password" : "xxxxxxxxxxxxxxxxxxxx",
"devicename" : "home",
"email" : "user@example.com"
}
EOF
cat << 'EOF' > /opt/jdownloader/cfg/org.jdownloader.settings.GeneralSettings.json
{
"defaultdownloadfolder" : "/srv/data/Download/"
}
EOF
cat << 'EOF' > /opt/jdownloader/cfg/org.jdownloader.extensions.extraction.ExtractionExtension.json
{
"freshinstall" : false,
"enabled" : false
}
EOF
cat << 'EOF' > /opt/jdownloader/cfg/org.jdownloader.captcha.v2.solver.solver9kw.Captcha9kwSettings.json
{
"mouse" : true,
"apikey" : "XXXXXXXXXXXXXXXXXX"
}
EOF
cat << 'EOF' > /opt/jdownloader/cfg/org.jdownloader.gui.views.linkgrabber.addlinksdialog.LinkgrabberSettings.json
{
"autoextractionenabled" : false
}
EOF
cat << 'EOF' > /opt/jdownloader/cfg/org.jdownloader.controlling.packagizer.PackagizerSettings.json
{
"packagizerenabled" : false
}
EOF
chown -R jdownloader:jdownloader /opt/jdownloader/

cat << 'EOF' > /etc/systemd/system/jdownloader.service
[Unit]
Description=JDownloader
After=network.target

[Service]
ExecStart=/usr/bin/java -Djava.awt.headless=true -Xmx512m -jar /opt/jdownloader/JDownloader.jar
Type=simple
User=jdownloader
Group=share
RemainAfterExit=yes
UMask=0002

[Install]
WantedBy=multi-user.target
EOF

systemctl enable jdownloader
Backup
For backup I connect 2.5 HDD directly to APU2 via USB 3. I wanted cross platform accessible encrypted backups so I tried VeraCrypt with exFAT/NTFS but the speed of sequential writes was usually between 20-60 MB/s. In the end I decided for native Linux encryption via LUKS (& AES 256) in combination with EXT4 filesystem as that performs best and is able to utilize the full speed of HDD, usually around 110-120 MB/s.
Also rsync is heavily limited by the APU2’s CPU (as it always calculates rolling MD5 checksum). Because of that I use rsync only for syncing deletions (cp for copying). I switched to patched rsync with no checksums.
The whole backup is performed automatically after connecting the drive via USB (package “at” is required). The start and end are signalized by different beeps. I can also monitor the status of backup via “watch -n 1 progress -w” (after installing the progress utility).
The solution to start backup is hacky but the proper systemd way is unknown.
To create encrypted LUKS volume:
dd if=/dev/zero of=/dev/sdb bs=512 count=1
sgdisk --zap-all /dev/sdb
sgdisk --clear --set-alignment=2048 --new=1:0:0 --typecode=1:8300 /dev/sdb
cryptsetup luksFormat --cipher aes-xts-plain64 --key-size 256 --hash sha256 /dev/sdb1
echo -n 'PASSWORD' | cryptsetup open --type luks /dev/sdb1 backup --key-file -
mkfs.ext4 /dev/mapper/backup
cryptsetup close backup
The rest of the setup:
cat << 'EOF' > /usr/local/bin/backup-usb
#!/bin/bash

#############################
mount () {
  echo -n 'PASSWORD' | /usr/sbin/cryptsetup open --type luks /dev/$DEV backup --key-file -
  mkdir -p /media/backup/
  /usr/bin/mount /dev/mapper/backup /media/backup/
}
backup () {
  beep
  rsync --archive --recursive --delete-before --filter="dir-merge,n- .rsync-exclude" --exclude ".recycle" /srv/data/ /media/backup/
  beep && sleep 1 && beep && sleep 1 && beep
}
restore () {
  beep
  \cp -pru /media/backup/* /srv/data/
  touch /srv/data/.backup
  beep && sleep 1 && beep
}
unmount () {
  set +e
  /usr/bin/umount /media/backup/
  /usr/sbin/cryptsetup close backup
}
############################

shopt -s dotglob
set -e
CMD=${1:-backup}
DEV=${2:-sdb1}

if [ "$CMD" == "backup" ] ; then
  if [ ! -f /srv/data/.backup ] ; then
    echo "Source may be empty as .backup is missing"
    exit 1
  fi
  sleep 1
fi
/usr/sbin/cryptsetup isLuks /dev/$DEV

if [ "$CMD" == "backup" ] || [ "$CMD" == "restore" ] || [ "$CMD" == "mount" ] ; then
  mount
fi

if [ "$CMD" == "backup" ] ; then
  backup
fi

if [ "$CMD" == "restore" ] ; then
  restore
fi

if [ "$CMD" == "backup" ] || [ "$CMD" == "restore" ] || [ "$CMD" == "unmount" ] ; then
  unmount
fi
EOF

cat << 'EOF' > /usr/local/bin/beep
#!/bin/bash
echo -en "\a" > /dev/tty5
EOF

cat << 'EOF' > /usr/local/bin/udev-backup-usb
#!/bin/bash
/usr/bin/echo /usr/local/bin/backup-usb "$@" | /usr/bin/at now
EOF

chmod +x /usr/local/bin/*

cat << 'EOF' > /etc/udev/rules.d/99-backup.rules
ACTION=="add", SUBSYSTEM=="block", KERNEL=="sd[b-z]1", RUN+="/usr/local/bin/udev-backup-usb backup '$kernel'"
EOF
Miscellaneous
For less kernel messages disrupting terminal (especially when starting/working via COM serial):
echo "kernel.printk=3 4 1 3" > /etc/sysctl.d/10-silent.conf
To automatically download updates without installing. (yum-cron is too buggy after my testing – it’s just impossible to fully disable generating messages without disabling anacron in globally.)
cat << 'EOF' > /etc/cron.daily/yum-update
#!/bin/bash
yum update --downloadonly &> /dev/null
EOF

chmod +x /etc/cron.daily/yum-update
Install progress:
yum -y install ncurses-devel
git clone https://github.com/Xfennec/progress /root/progress/
make --directory=/root/progress/ && make --directory=/root/progress/ install
More
Please note that it’s version 1 which I’ve used only for little over a week for few weeks. More to come later.